What is the Machine ID?

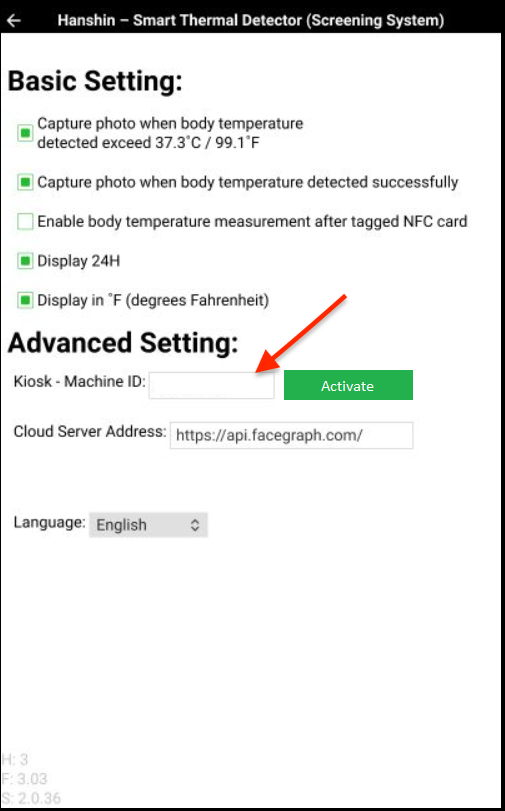
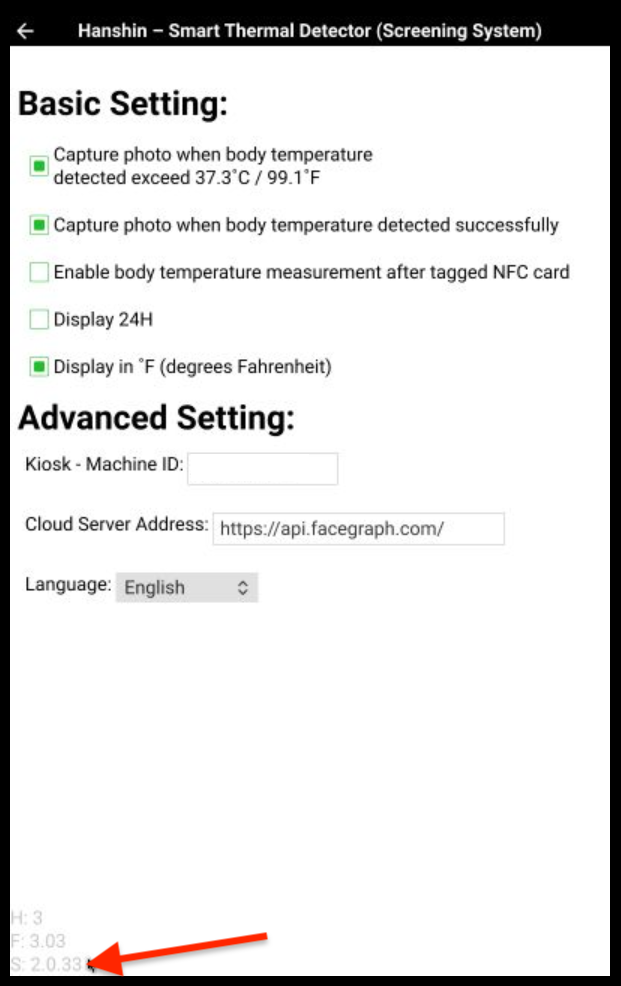
Machine ID is needed to associate your SmileMe.In cloud account to your Smart Thermal Kiosk.

Follow the steps below to generate a Machine ID from the SmileMe.In portal.

Steps:

  1. Login to the SmileMe.In portal with your Admin account
  2. Go to Devices then click Add Device
  3. Give your device a name
  4. Select a Room (for Education account) or Department (for Workplace account) and set Device type to 10.2″ Thermal Scanner
  5. Click Save
  6. Machine ID will be generated and displayed on the bottom of the device card, as shown in this image
  7. To associate you SmileMe.In account to your Smart Thermal device follow the steps listed in this article

How to change the temperature unit on your Smart Thermal Kiosk

Steps:

  1. From the Hanshin Measurer app, go to the Settings screen by clicking on the account icon (located on the bottom right corner)
  2. Enable the  “Display in °Fahrenheit” checkbox if you want the temperature readings to be in °Fahrenheit
  3. Or, if you want the temperature readings to be in °Celsius, disable the “Display in °Fahrenheit” checkbox

How to reset your passcode using the phone app

Steps:

  1. Download the phone app from the app store:
    – If your company’s account is registered as a Workplace account, please download the Workplaces Co app (iOS/Android) from the app store
    – If your company’s account is registered as a School account, please download the School Co app (iOS/Android) from the app store
  2. Log into the phone app using your SmileMe.In credentials
  3. Open the side menu by tapping on the menu icon
  4. Tap on My Profile
  5. On My Profile screen, tap Change that is displayed next to Passcode
  6. Enter the required information in the Change Passcode pop-up
    Note: Passcode should consist of only numbers, and should be between 6 to 10 digits long
  7. Tap Save
  8. All set! Your passcode is now set to the new passcode you specified

How to link RFID to a user

Steps:

  1. Scan the RFID (card, key fob, sticker,…) to the RFID reader in the Smart Thermal Device to get the RFID number/code.
    *Take note of the RFID number/code displayed at the bottom right corner of the Hanshin Measurer app.
  2. Login to the SmileMe.In portal with your Admin account credentials
  3. From the side menu, navigate to Users > All users page
  4. Edit the User you would like to link the RFID with
  5. In Edit User page, enter the RFID number/code in the RFID field
  6. Click Save
  7. All set! That user will now be associated to that RFID
  8. The next time the user scans his/her RFID using the Smart Thermal kiosk, an attendance record (with temperature reading) will be created for that user

How to access the images captured from the Smart Thermal

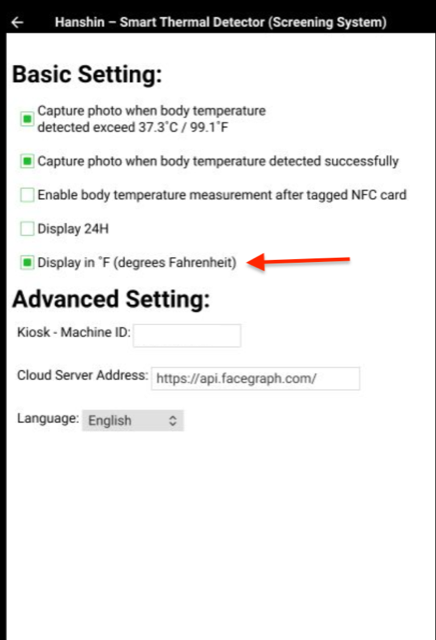
If you have (or had) any of the “Capture Photo” options enabled in the Hanshin Measurer app settings, the captured images are stored locally on your device.
Note: If you have associated your device to the SmileMe.In account, then images stored locally on your device are imported into your SmileMe.In cloud account and deleted from the device.

Follow these steps to access the images saved locally on your device:
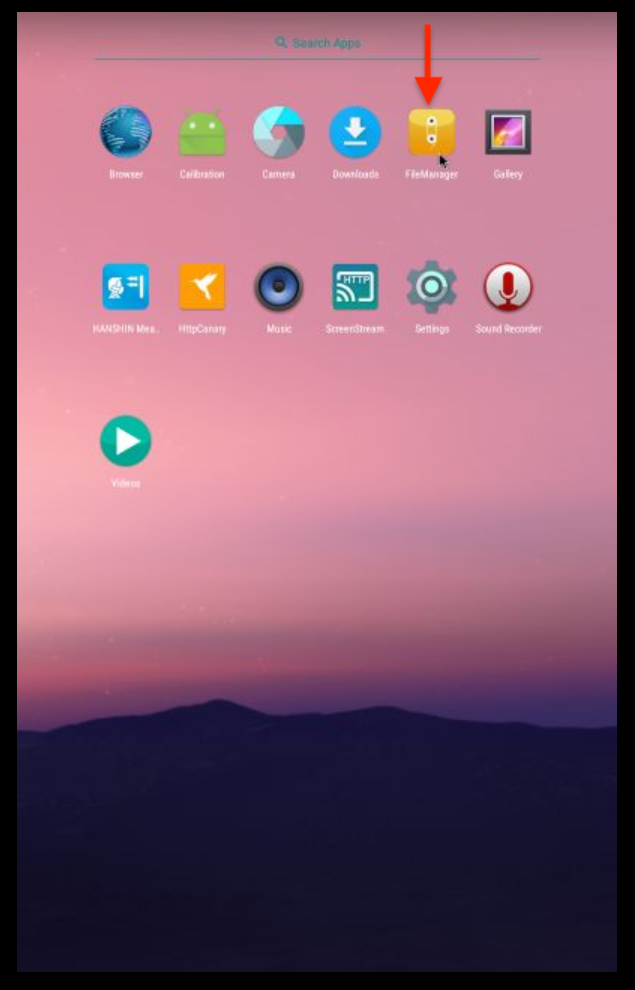
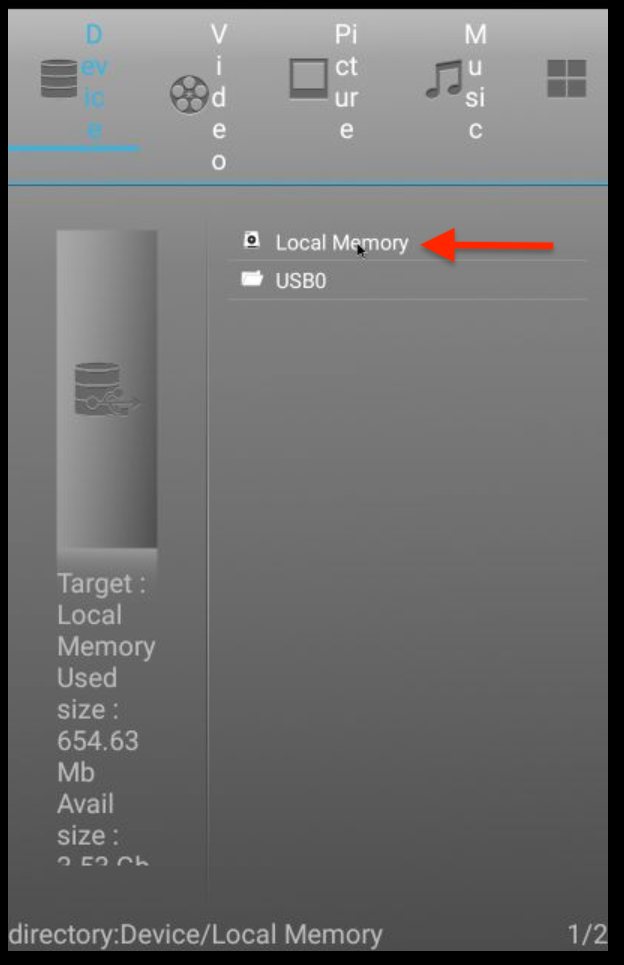
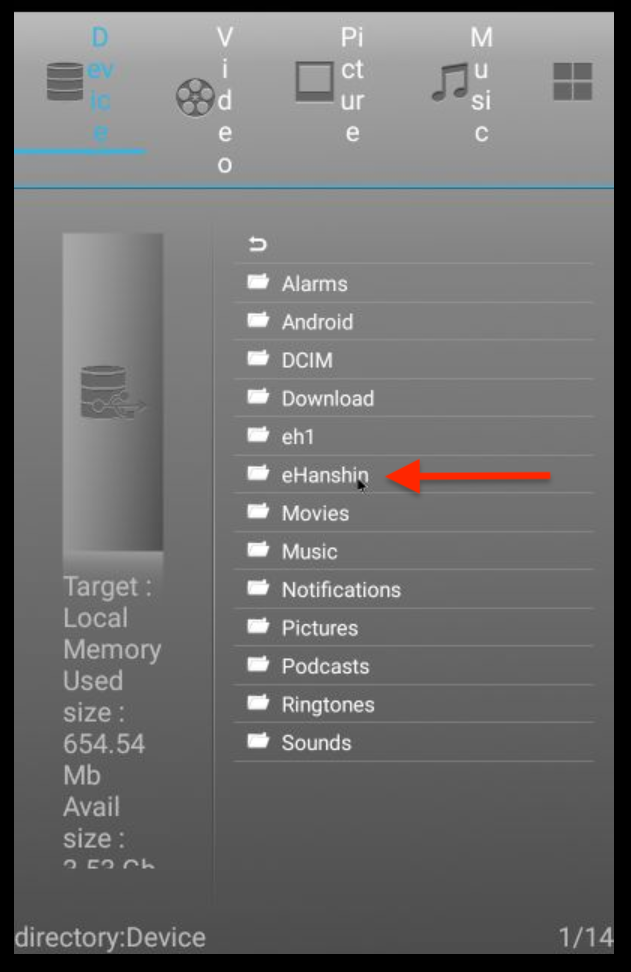
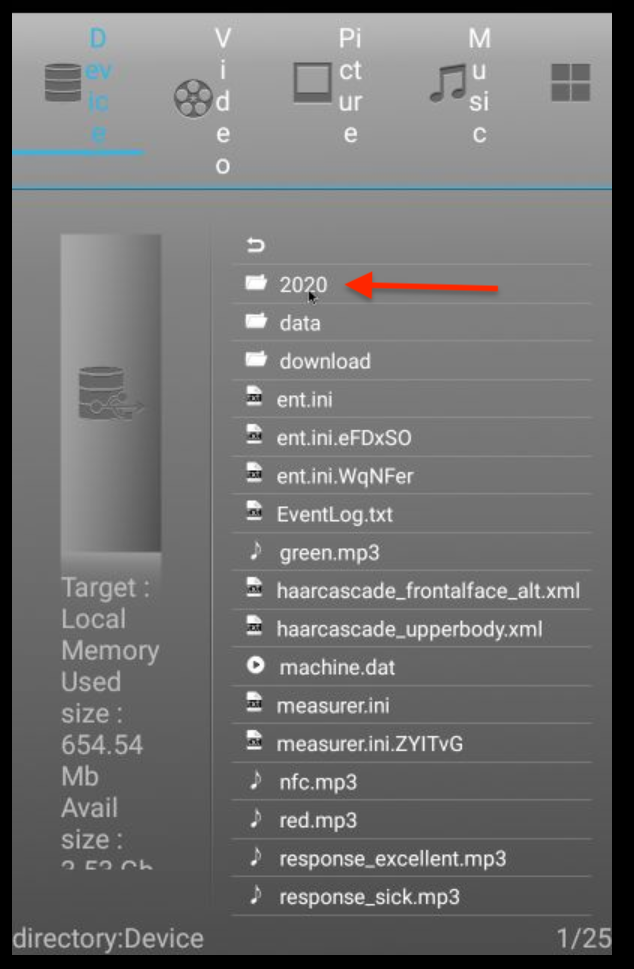
  1. From your device home screen, open the File Manager
  2. Click on Local Memory
  3. Click eHanshin folder
  4. Click 2020
  5. In the 2020 folder, there will be a sub-folder for each month, then each month will have a sub-folder for each day. The images will be stored in the corresponding month & day it was captured.

How to upgrade the software version on your Smart Thermal Scanner

Steps:

  • Plug a USB mouse to the Thermal Scanner, and make sure your Smart Thermal Device is connected to the internet
  • Launch the Hanshin Measurer app to open the app Settings screen, by clicking on the silhouette icon displayed on the bottom right corner

  • Take note of the the current version installed on your device; the version number is displayed at the bottom left corner of the app’s Settings screen

  • Keep the Settings screen open for 60 seconds for the device to check for a available update
  • Click on the Software Upgrade button displayed the bottom of the app’s settings screen
  • After the progress bar has completed, you’re device has been upgraded successfully
  • Make sure the Cloud Server Address is set to https://api.facegraph.com/
  • Restart your device and you’re all set!


    Note:
  • If you do not see the Software Update button, please check the following:
    • Your device is connected to the internet
    • The Cloud Server Address is set to https://api.facegraph.com/
    • The Hanshin Measurer app settings screen has been open for 60 seconds (for the device to check for updates)
  • If you purchased your Thermal Scanner after July 2020, then please skip the steps listed below.
    • If your device was purchased before July 2020, your device may be on an older app version (version 2.0.23 or lower), in that case please follow these steps to do the upgrade:
      1. Click on the Software Update button displayed the bottom of the app’s settings screen
      2. Exit the Hanshin Measurer app (by right-clicking to exit the scanning app)
      3. Open the File Manager (by clicking on the File Manager icon on the device home screen)
      4. Click Local Memory
      5. Click eHanshin
      6. Click Downloads > in the Downloads folder, click on Software Update file
      7. The update should install, and you should see the progress bar
      8. Go to the settings screen of Hanshin Measurer app
      9. Make sure the Cloud Server Address is set to https://api.facegraph.com/
      10. You’re all set! For any future updates, the upgrade will be automatically installed once you click on Software Update button


How to delete facial recognition images for a user on the SmileMe.In Portal

If you have users created in the SmileMe.In portal, and have set up facial recognition for user(s), you may use your Admin account to manage these images from the SmileMe.In portal.

Steps:

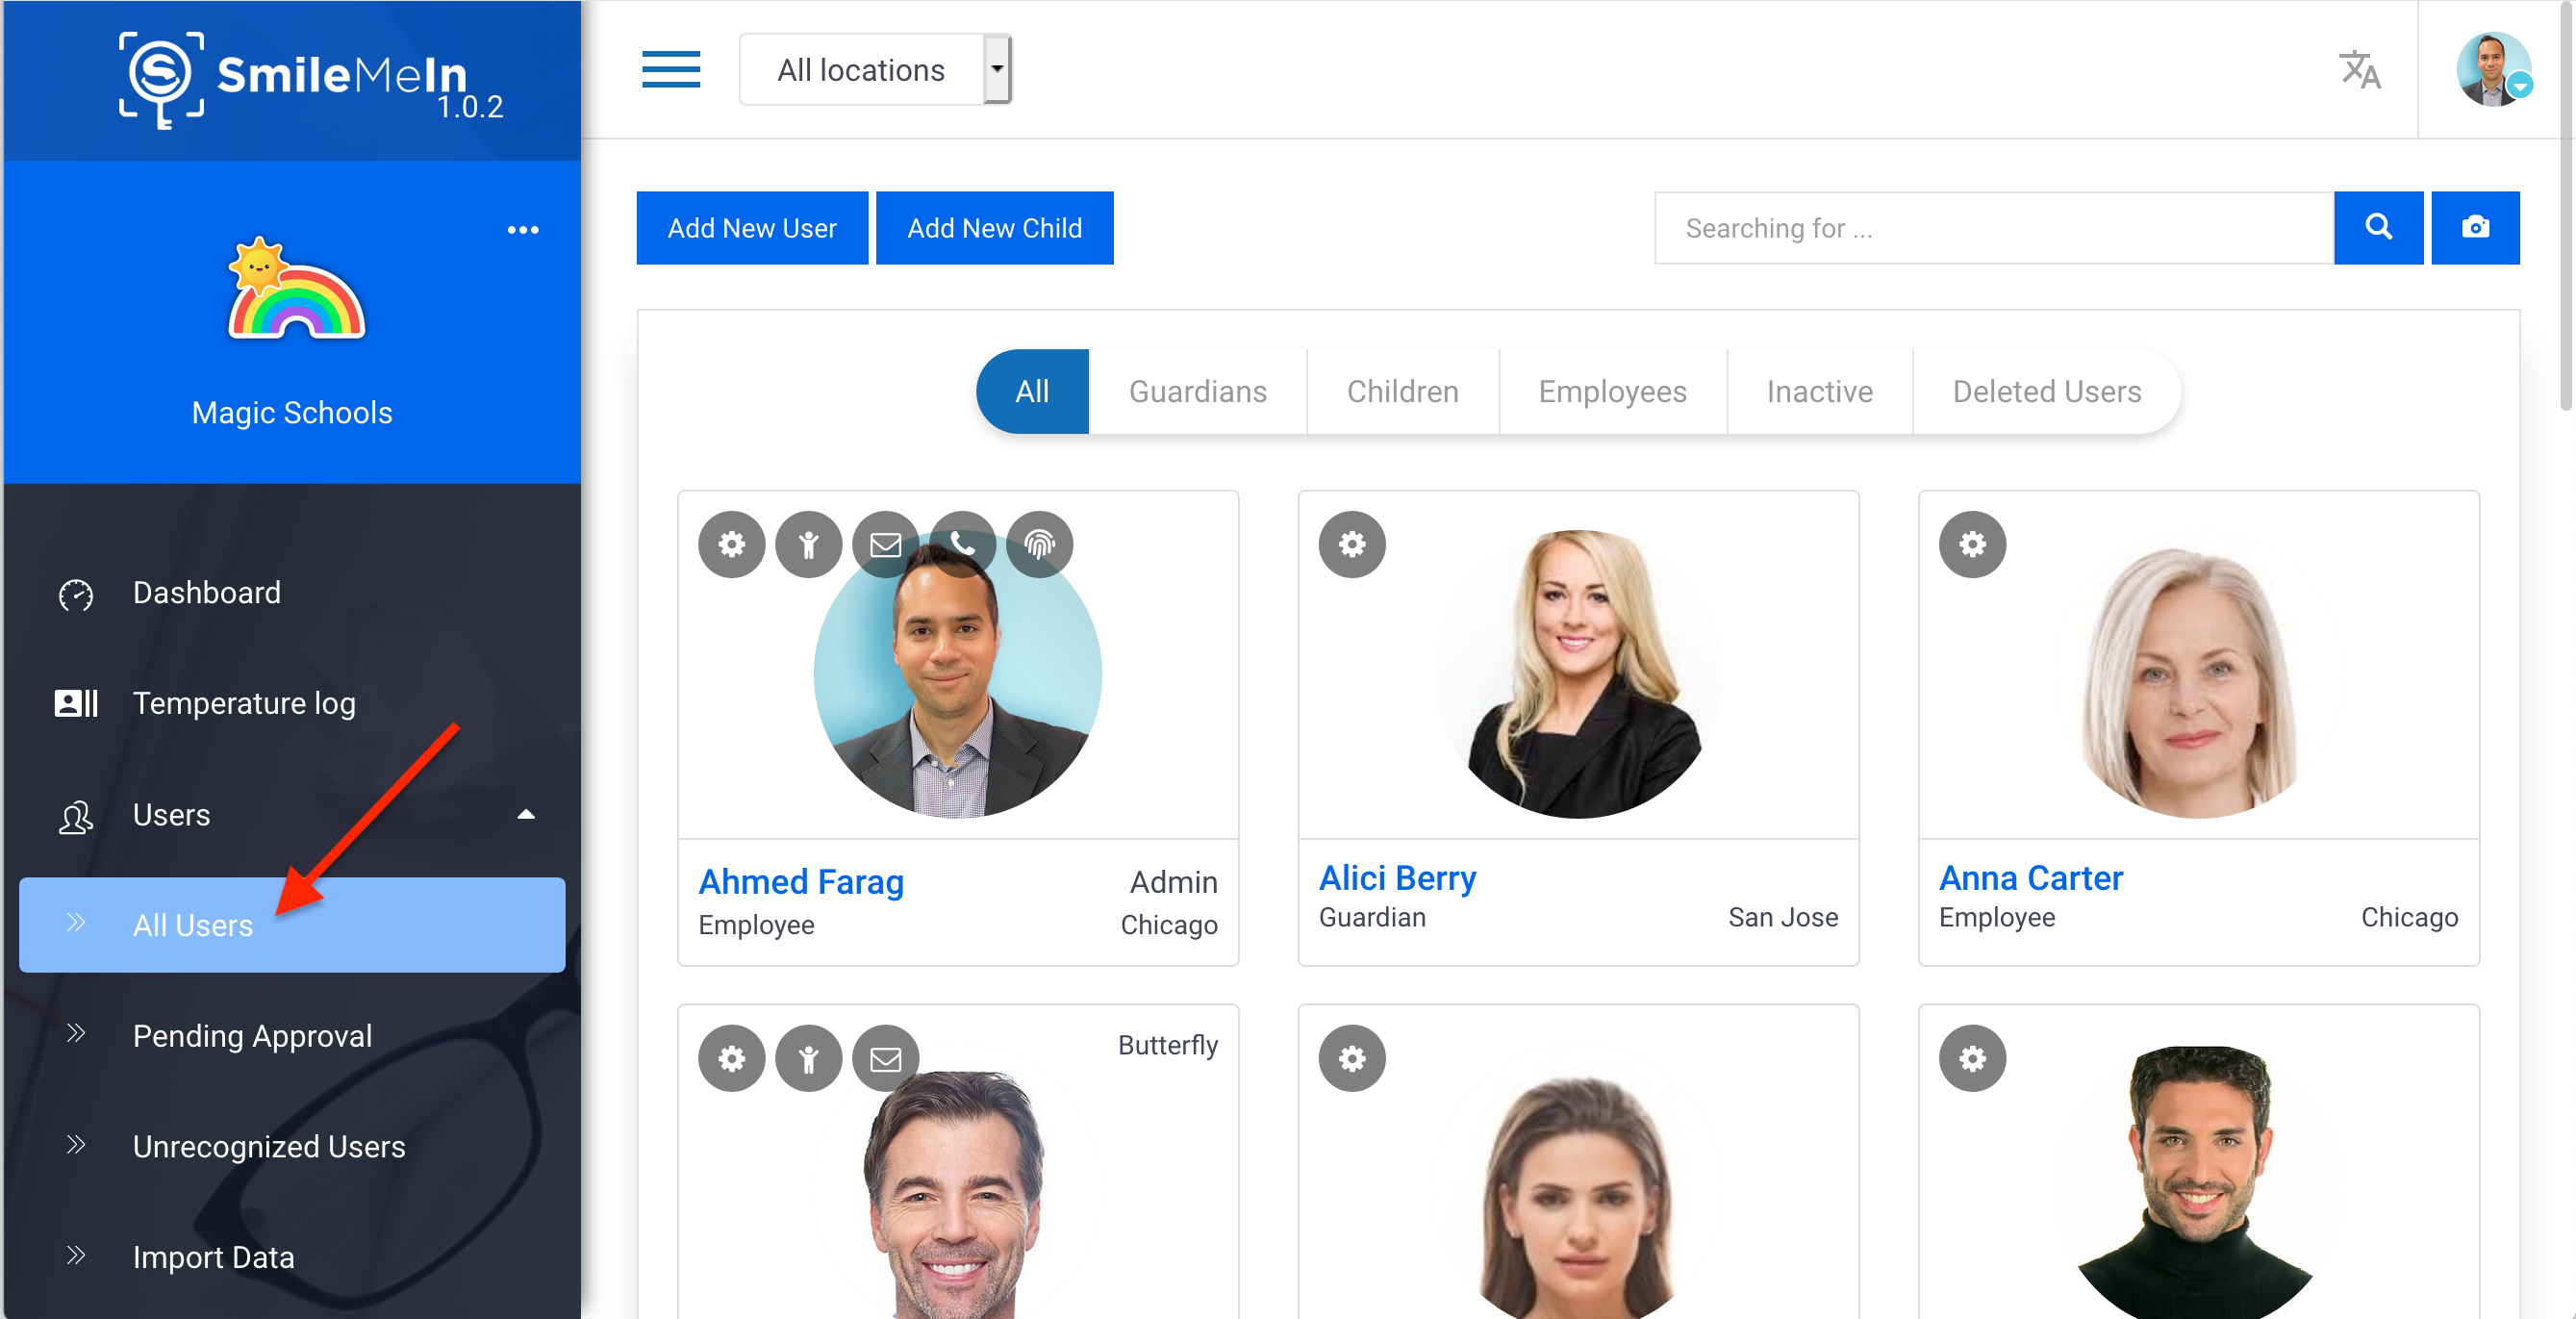
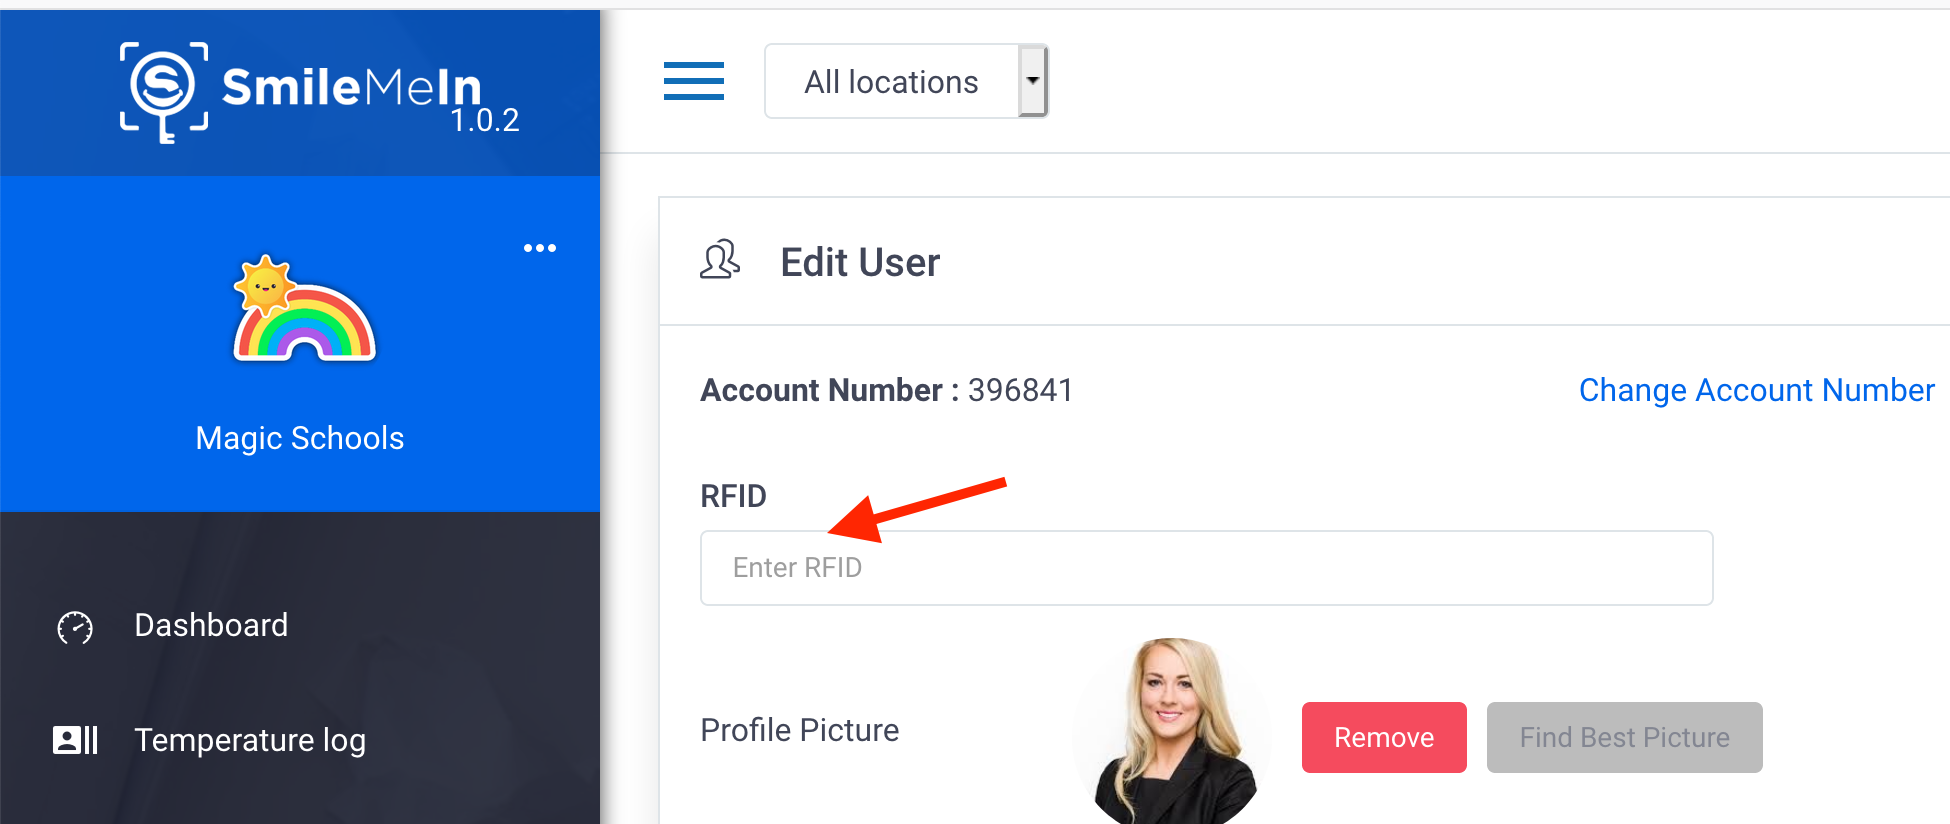
1) Login to the Portal with your Admin account
2) Click Users from the side menu, then click All Users 
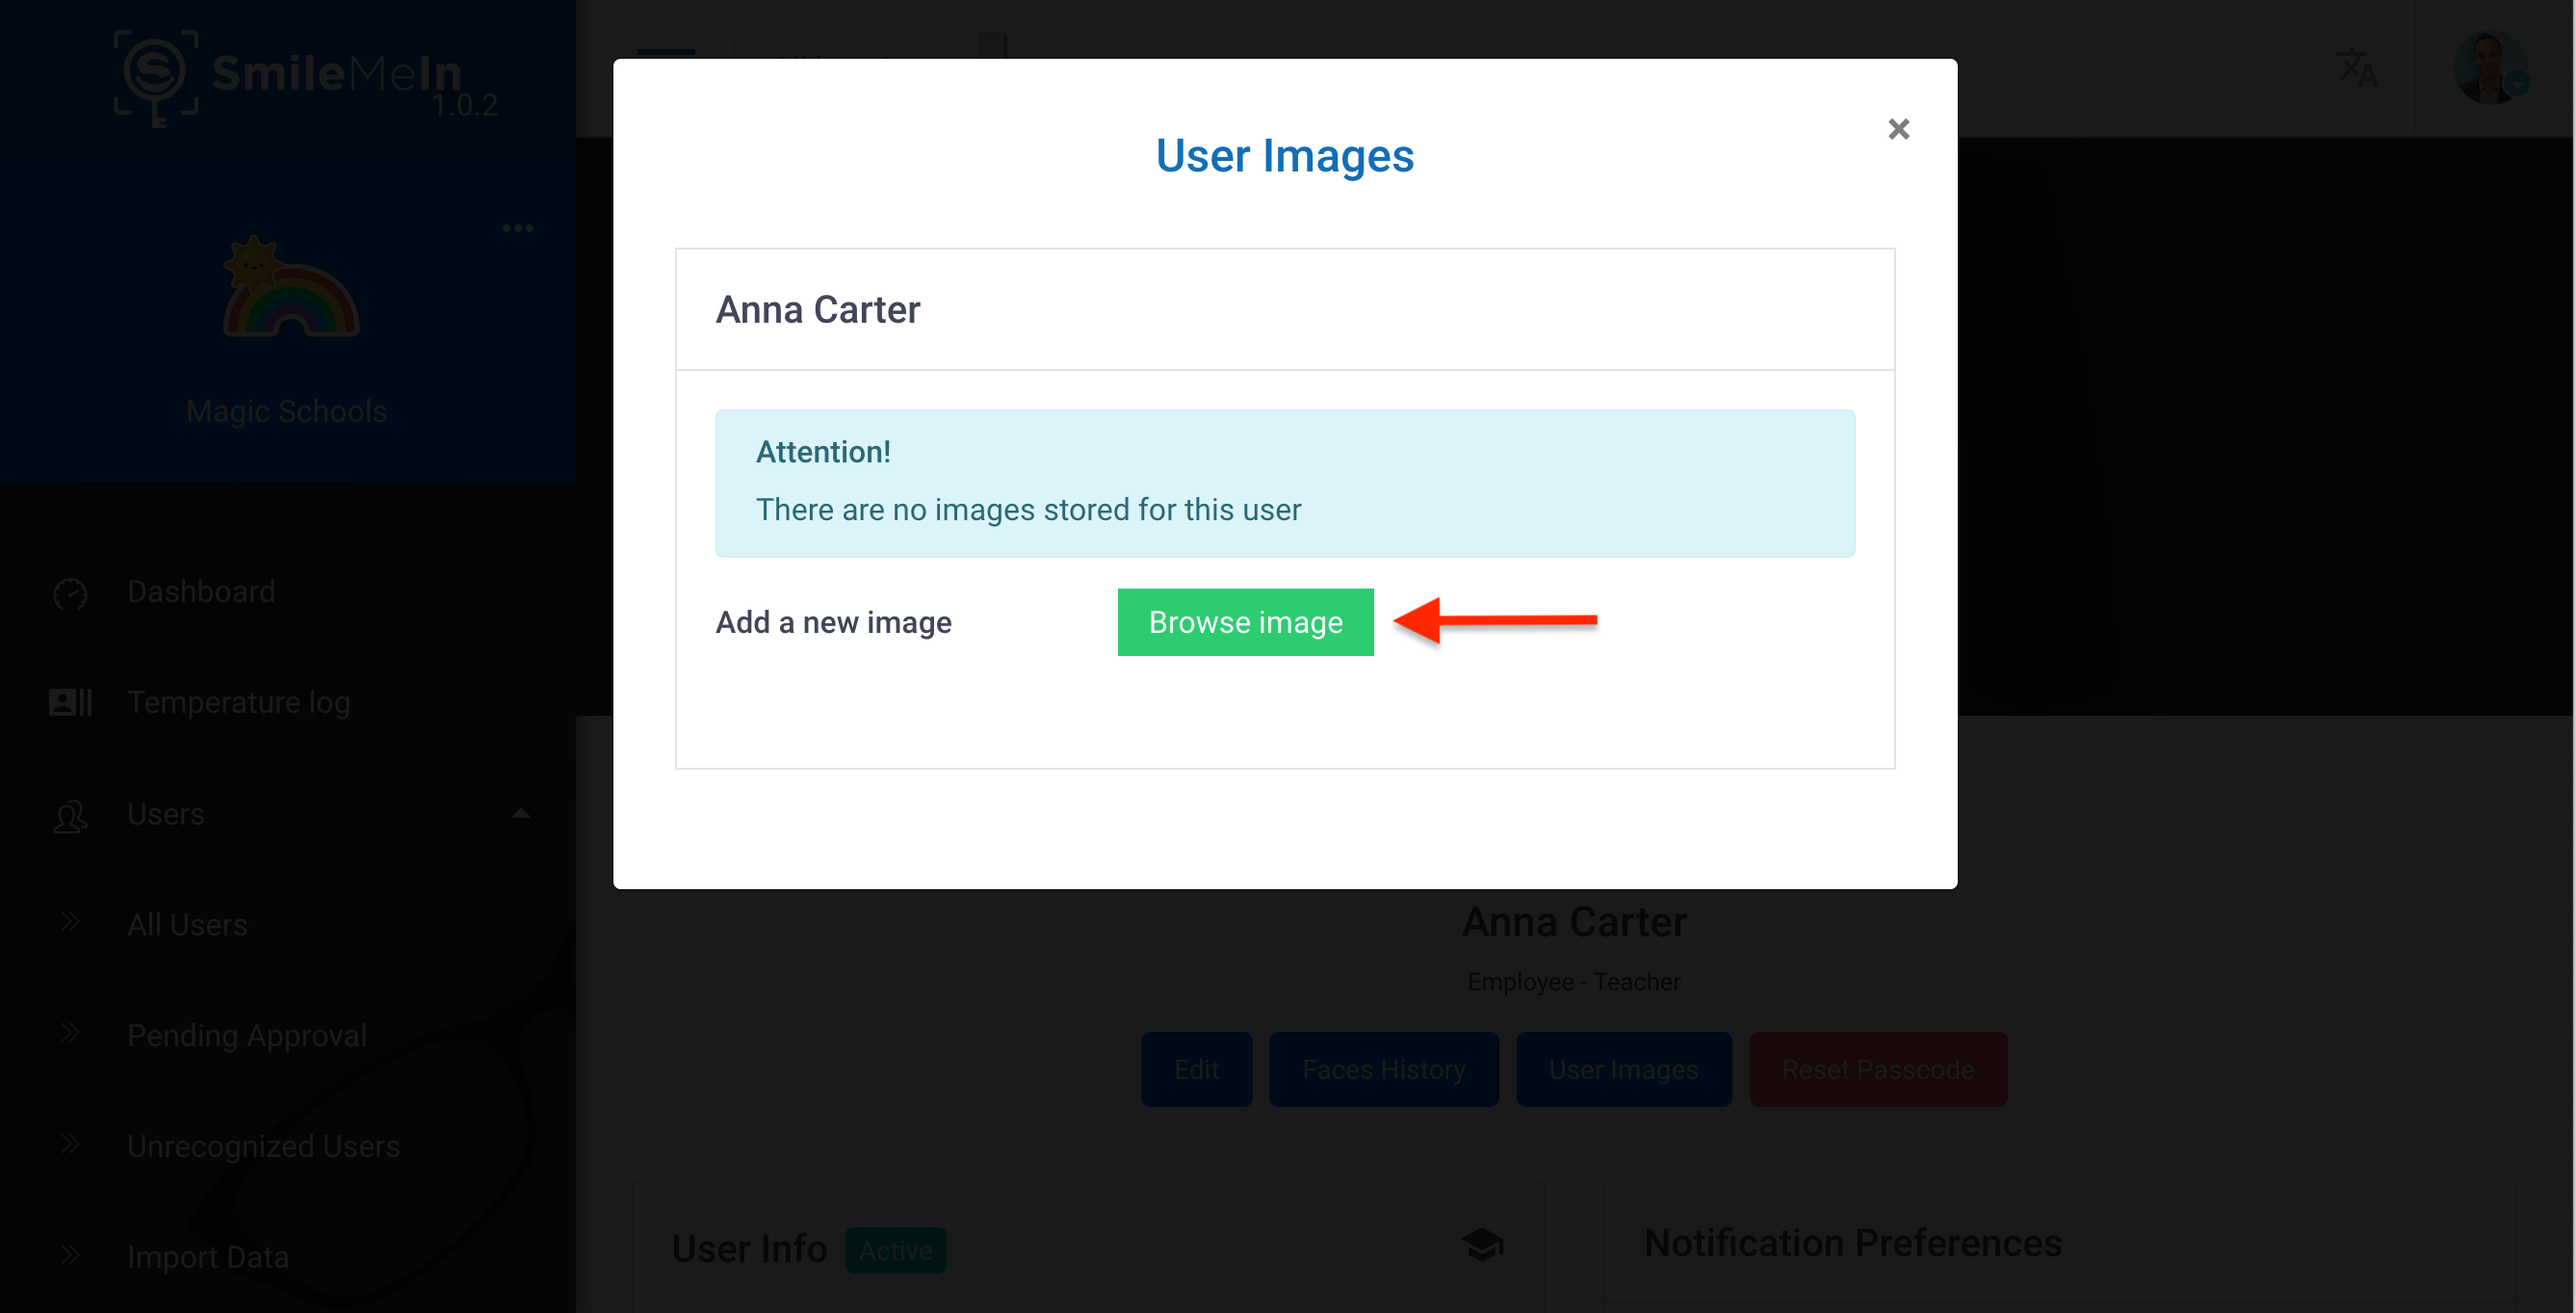
3) Click on the name of the user you would like to delete the images for, then click User Images button

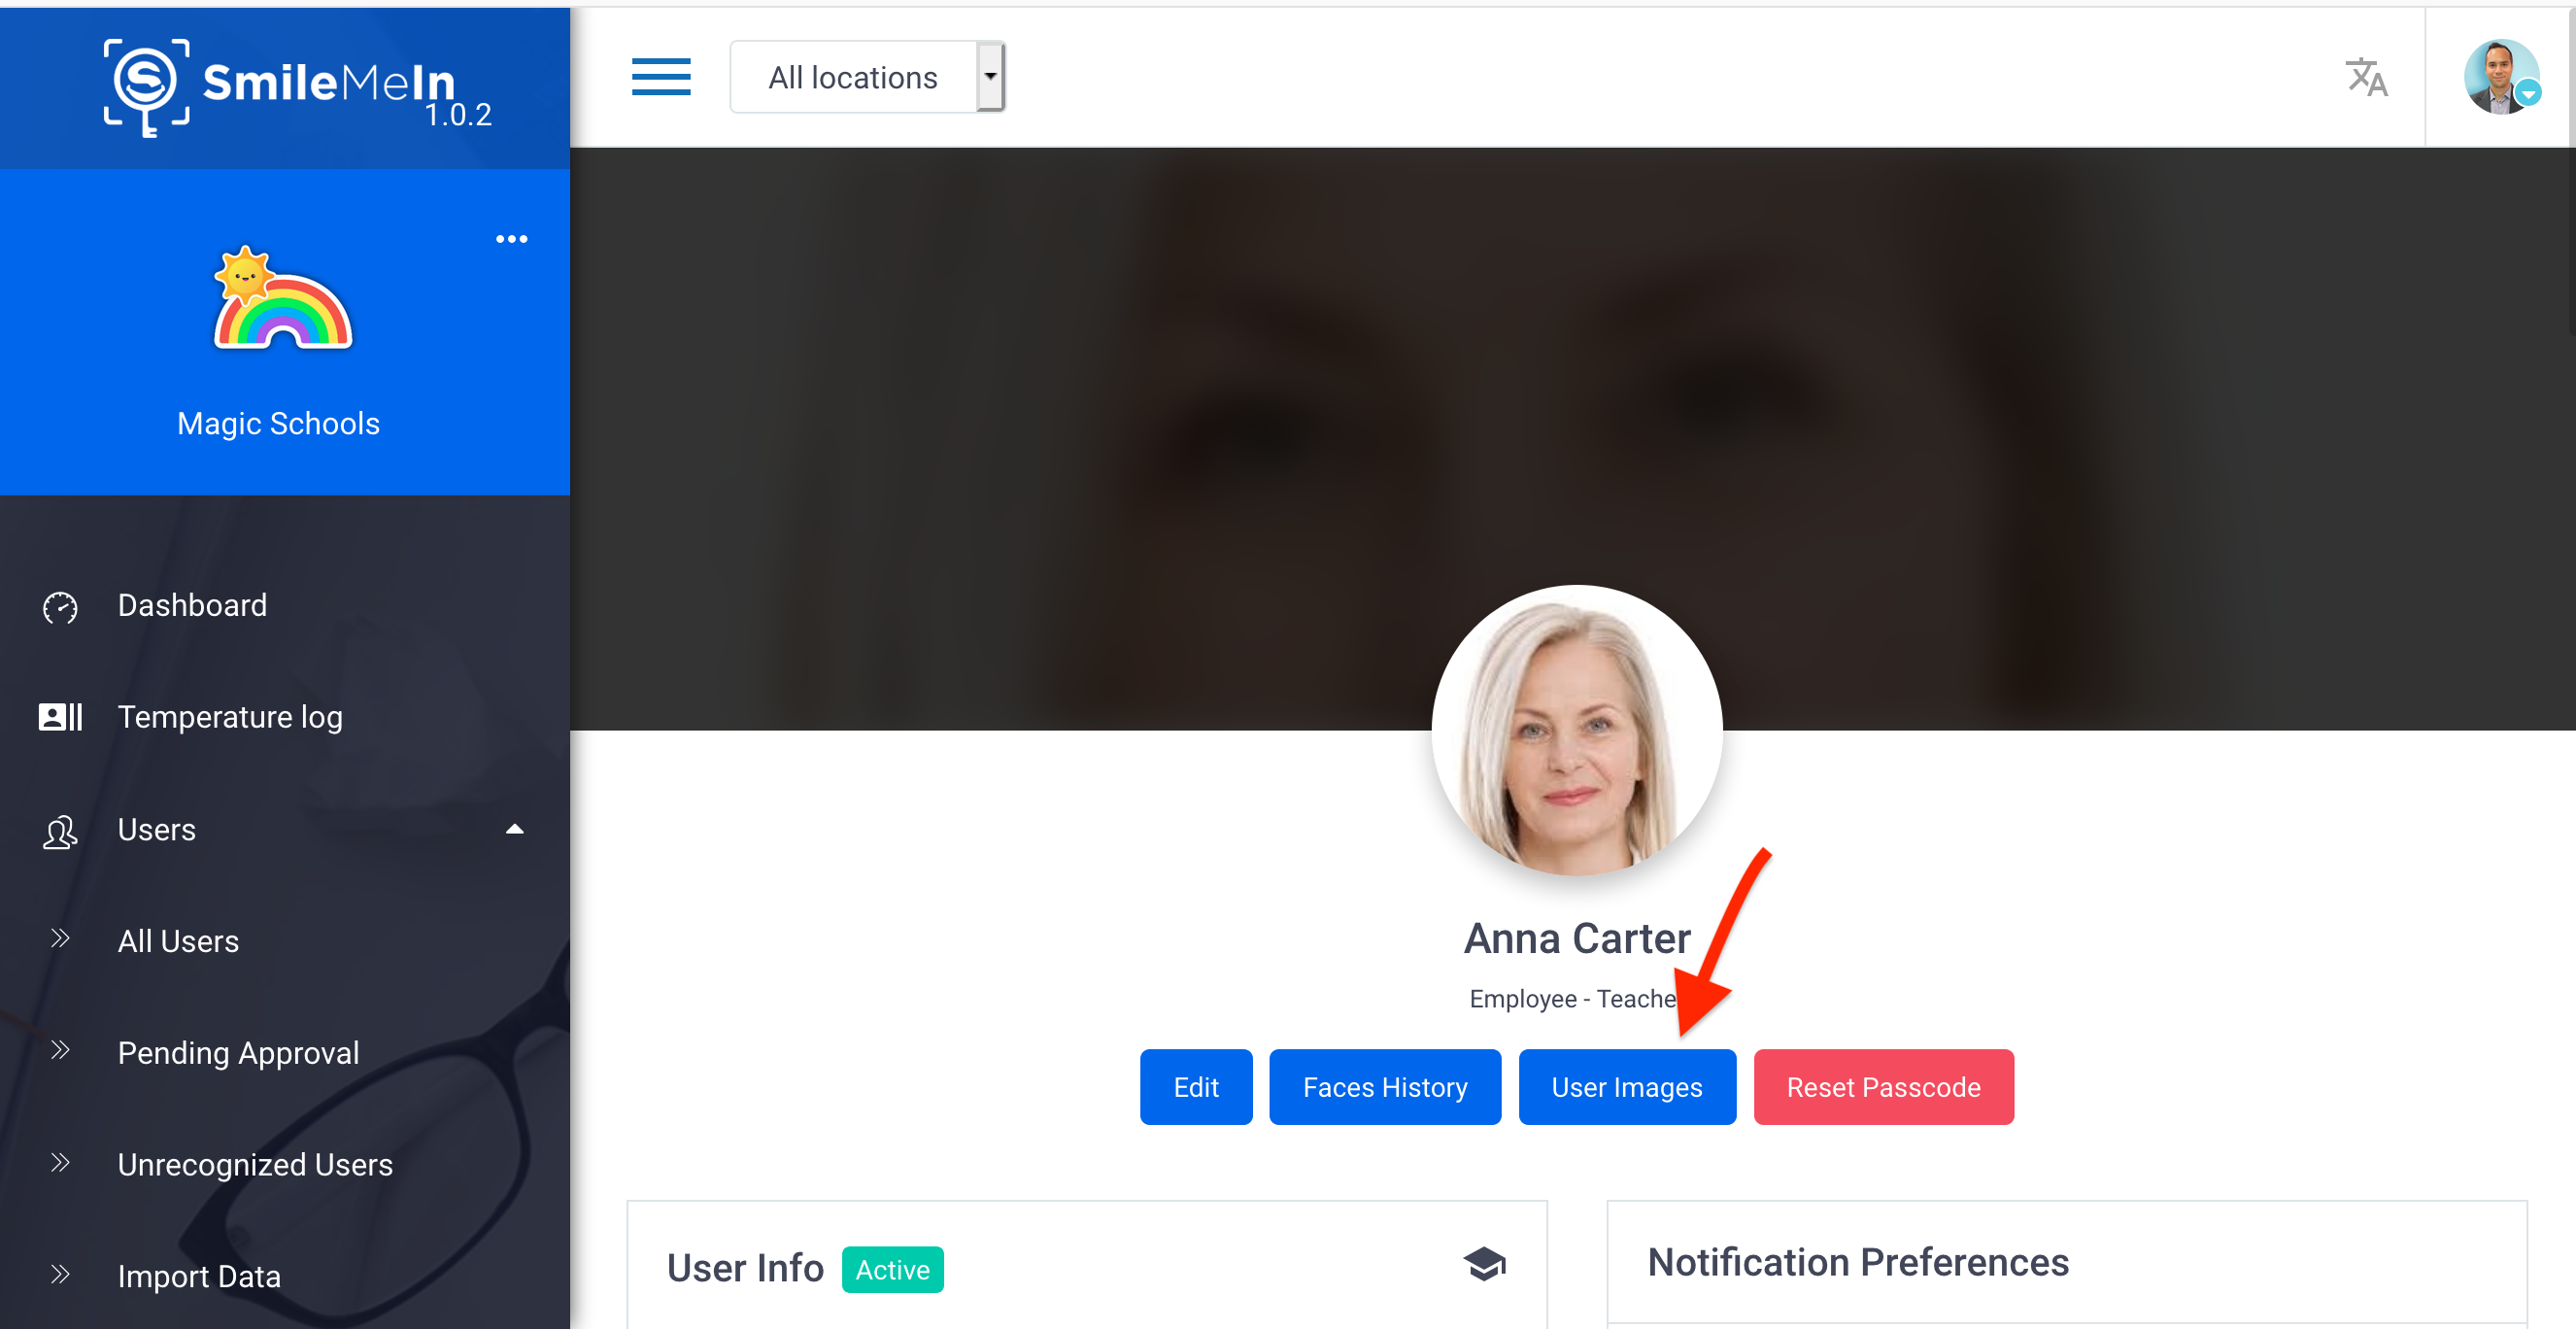
4) Click Reset Training Data button if you want all training images for that user to get deleted

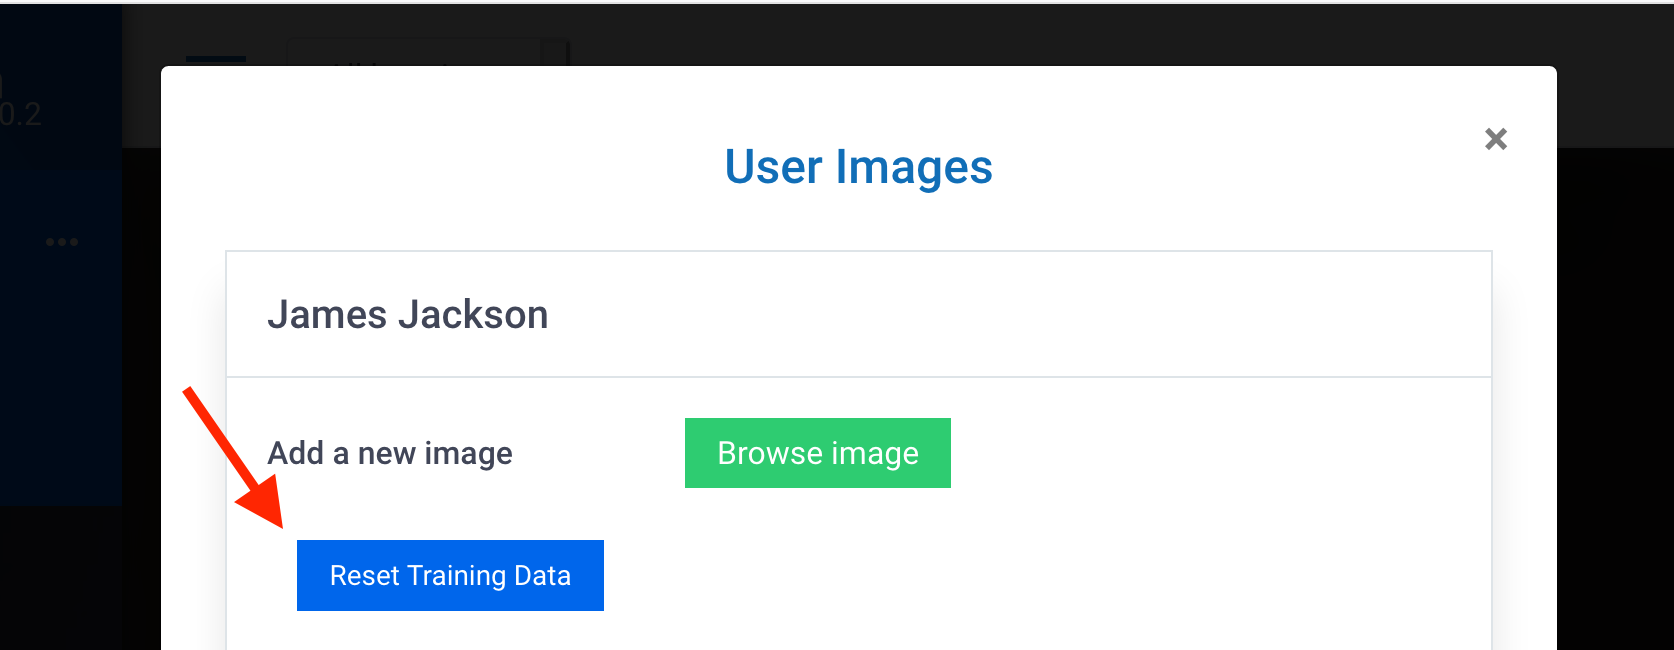
5) Click Faces History button then select each Recognition History image that you want deleted, click on the delete icon


Note:
Training Data images are the images taken when a user starts the facial recognition training. It enables the system to recognize the user’s face
Recognition History/Faces History images are the images taken for users that are already recognized, when using the Smart Thermal device or SmileMe.In apps

How to enable Facial Recognition for a user

  1. Login to the SmileMe.In Portal using your Admin account
  2. Navigate to the “All users” page by clicking on Users from the side menu, then All Users from the sub-menu
  3. Open the User Info page for the user you would like to enable facial recognition for, by clicking the on the user’s name
  4. Click on User Images button
  5. Click Browse image to upload face images. We recommend you upload 3 or more photos for each user for better recognition experience
  6. All set! The system will now recognize that user
  7. Note: You may always add or remove images from the User Images if needed